

Imagine not having your five senses!
How would you navigate the real world?
Our five senses help us make ‘sense’ (pardon the pun) of the physical world around us. They help us see (sight) where we are going, hear (sound) music, feel (touch) raindrops, smell perfumes and taste foods.
They do much more than those things of course, but you get the jist.
Sensors in the electronic world play pretty much the same role (and probably why they are called sensors for that reason).
They help computing and electronic systems by allowing them to get physical real world data.
One of those sensors helping these types of systems and used in many applications is the Ultrasonic Sensor.
But, what exactly are ultrasonic sensors?
Ultrasonic sensors are a type of proximity sensor which are used for detecting the distance of an object, or the presence of objects, without the need of physically making contact with those objects. The ultrasonic sensor uses ultrasonic sound waves (hence the name) to detect objects.
This is just the tip of the iceberg when it comes to the ultrasonic sensor. If you want to learn more about these awesome sensors, read on!
Deeper look at sensors
Since an ultrasonic sensor is a subcategory of Proximity sensors, which is furthermore a subcategory of the broader term Sensor, it will help to learn a bit more about sensors, as well as proximity sensors.
But, if you aren’t too concerned with learning about sensors or proximity sensors, you can skip straight to the section all about ultrasonic sensors.
What is a sensor
Computing and electronic systems in the most simplest form consist of inputs, a processor and outputs.
Let’s consider a computer. It has inputs (mouse, keyboard), a processor (Central Processing Unit), and outputs (printer, speakers, monitor).
So what is a sensor?
A sensor is a type of input device whose main function is to ‘sense’ physical changes in the environment (real world) and provide this information to the processor of the system.
Us humans have our own sensors.
Five of them!
We have the ability to make sense of the environment around us through Touch, Smell, Sight, Taste and Sound.
Just like a computing system, we too also have a processor (our brain), and outputs (arms, legs).
So, imagine you are at a party and the DJ plays your favourite song.
You are able to sense the sound waves traversing the airwaves using one of those five senses (in this case sound through your ears).
This information is sent to your brain (processor) which realises this is your favourite song! It then informs your body(output) to move uncontrollably (or controllably depending on your dancing skills) to the beat of the song.

Sensors in computing and electronic systems work in the same manner. They provide information from the world to the processor who can deal with that information as needed.
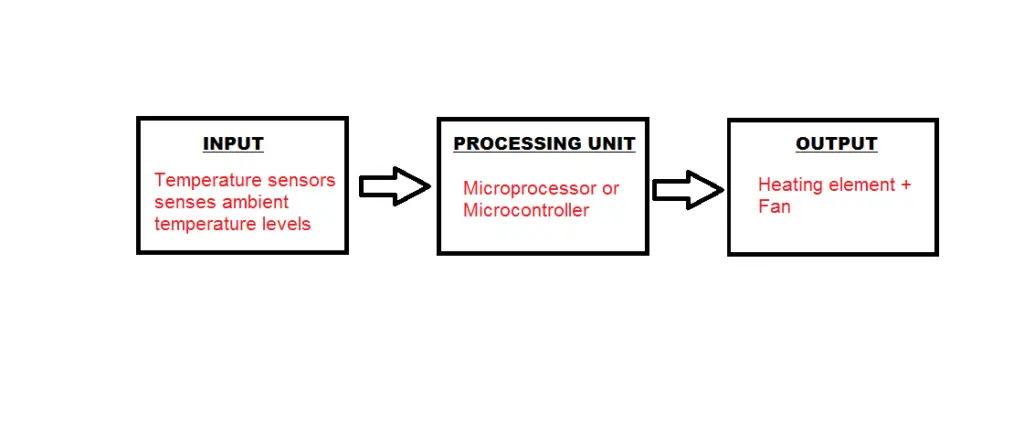
For example, let’s take a look at a fan heater.
This fan heater will have a temperature sensor which has the job to sense the ambient temperatures to ensure that the temperature you set is maintained.
If temperatures start to rise, the sensor will sense this rise, and then relay this information to the processor. The processor can then suspend heating until temperatures fall back to the levels you set.
Why we use sensors
But, are sensors really that essential?
The simple answer is yes!
There are many benefits to using sensors in systems.
Let’s go back to the heater. If it did not have a sensor, the temperature would rise above the level you set making the room hotter than you would like.
Sensors provide a means of feedback so that changes can be made if needed.
Other advantages include;
- Making systems more efficient
- Predictive and preventative maintenance
- Increasing accuracy
What are proximity sensors?
Now that we know what role a sensor has in a computing or electronic system, we can take a closer look at Proximity Sensors.
Just like we have different sensors that have different roles, and function in different ways, the electronic world has many different types of sensors each with its own unique sensing ability.
There are sensors to detect temperature, smoke, gas, altitude, speed, acceleration, and many more.
What about a proximity sensor? What does it do?
Proximity sensors are a classification of sensors that have the ability to detect objects without the need of physically touching them.
However,you aren’t limited to only one type of proximity sensor to achieve this. There are a variety of technologies used such as light, sound, infrared, electromagnetic, and capacitance, in proximity sensors that give them the ability to detect objects.
However, the main type of proximity sensor that we are concerned with in this article are Ultrasonic Sensors.
What are ultrasonic sensors?
So, how does an ultrasonic sensor detect objects without physical touch?
An ultrasonic sensor detects objects using ultrasonic sound waves (hence the name).
Ultrasonic sound waves (or ultrasound) sit at a frequency (greater than 20kHz) much higher than the upper audible limits that the human ear is capable of hearing (which is around 20kHz).So, you won’t hear any annoying sounds when near ultrasonic sensors.
However, while you might not be able to hear it, the physical properties of ultrasound do not differ from normal sound that we hear.
Construction of an ultrasonic sensor
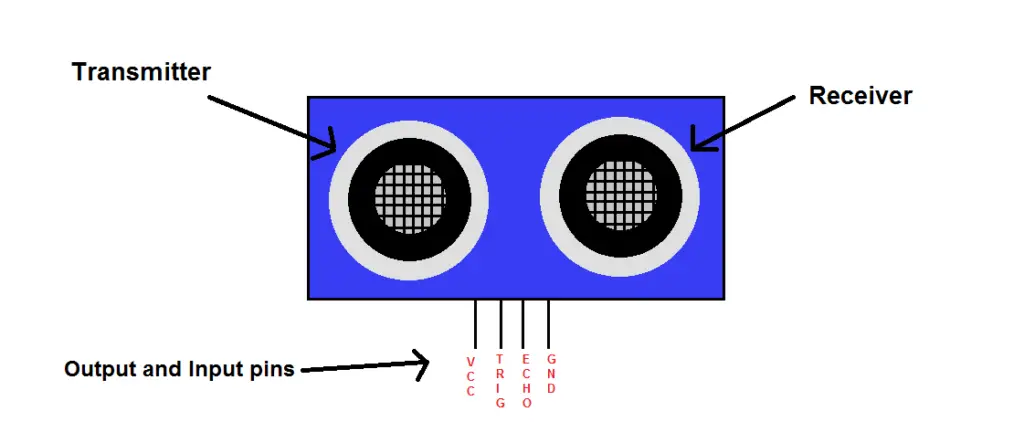
A typical ultrasonic sensor is broken into two parts;
- Transmitter (generates the sound waves)
- Receiver (which captures the sound waves when it reflects back from an object)
Below is a picture of what a typical ultrasonic sensor looks like.
To achieve the high sound frequencies, the ultrasonic sensor uses Piezoelectric Crystals. They oscillate at a high range of frequencies.
A typical ultrasonic sensor comes with 4 pins;
- VCC (connects to the positive rail of the power supply. Usually +5V)
- TRIG (connects to a digital output pin of a microcontroller)
- ECHO (connects to a digital input pin of a microcontroller)
- GND (connects to ground rail of the power supply)
I shall explain more about the connections of the ultrasonic sensor with a microcontroller later on.
Working principle of an ultrasonic sensor
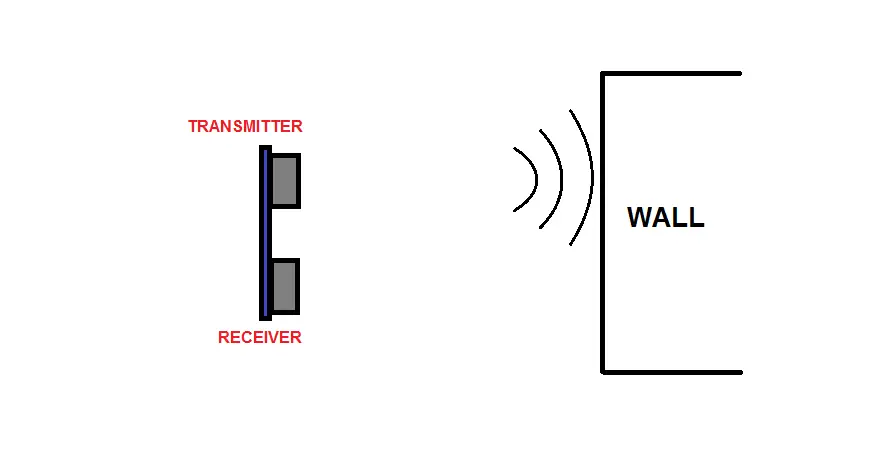
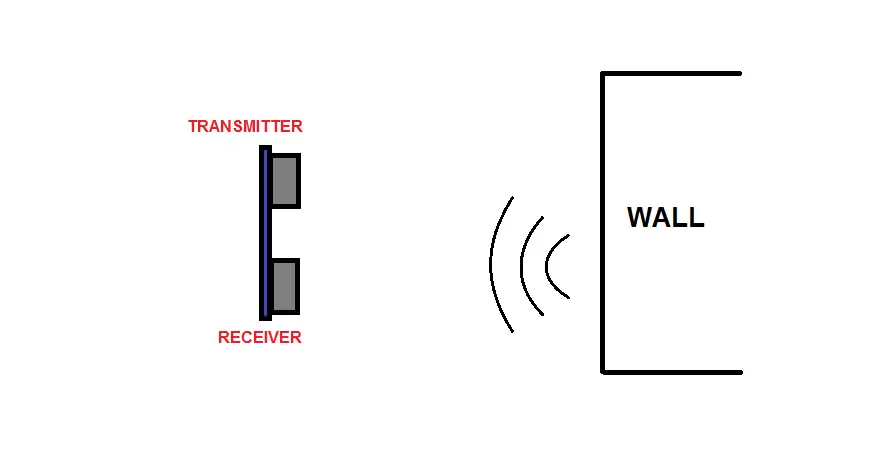
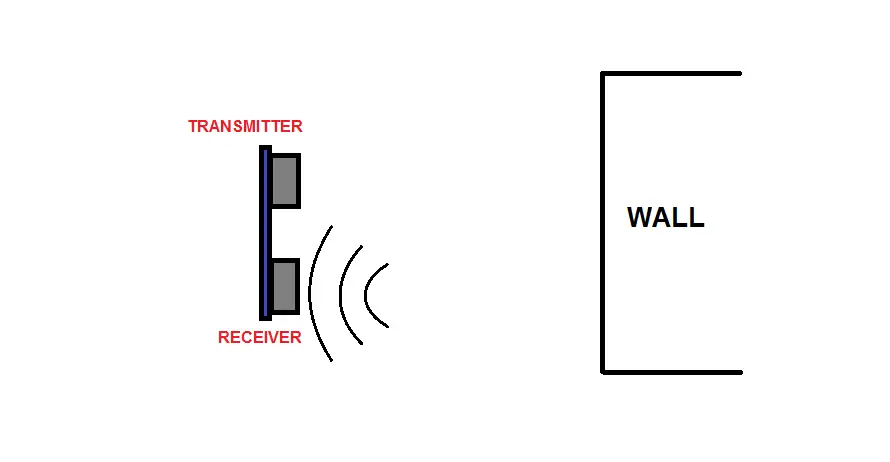
Let’s take a look at how this sensor goes about using ultrasound to find an object.
Looking at an example will help make things a bit more clearer.. Below is a diagram of an ultrasonic sensor placed in front of a wall.
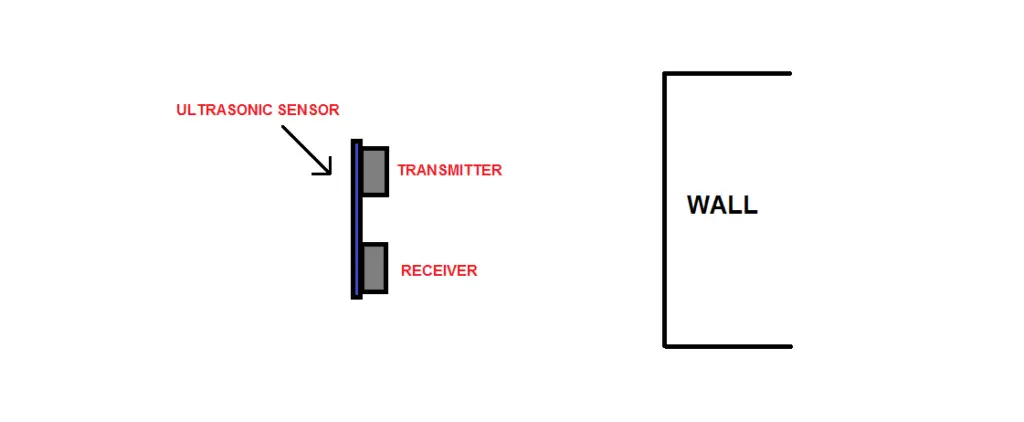
- The first step involves the ultrasonic sensor converting electrical energy to a sound wave. This sound wave is emitted from the ultrasonic transmitter.
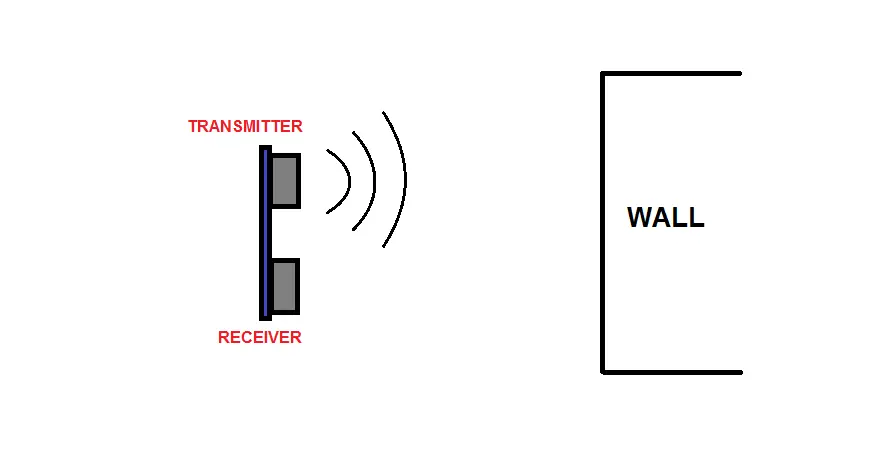
- Next, the sound wave travels through the air until it encounters an object, person, animal, etc (in this example a wall)
- The sound wave then hits the object (wall) and reflects back toward the ultrasonic sensor
- Finally the receiver of the ultrasonic sensor receives the reflected wave and a time stamp is calculated with the help of a microcontroller.(I shall explain in more detail how to calculate the distance using this time variable in the next section)
How to calculate the distance of an object using an ultrasonic sensor?
Calculating the distance of an object using this sensor comes down to a fundamental equation which you would have learned about in high school science class, along with the fact that we know that the speed of sound, which is roughly 343 m/s (through dry air at around 20 °C).
Below is a fundamental equation to calculate speed, distance and time, which you might recall from science class;
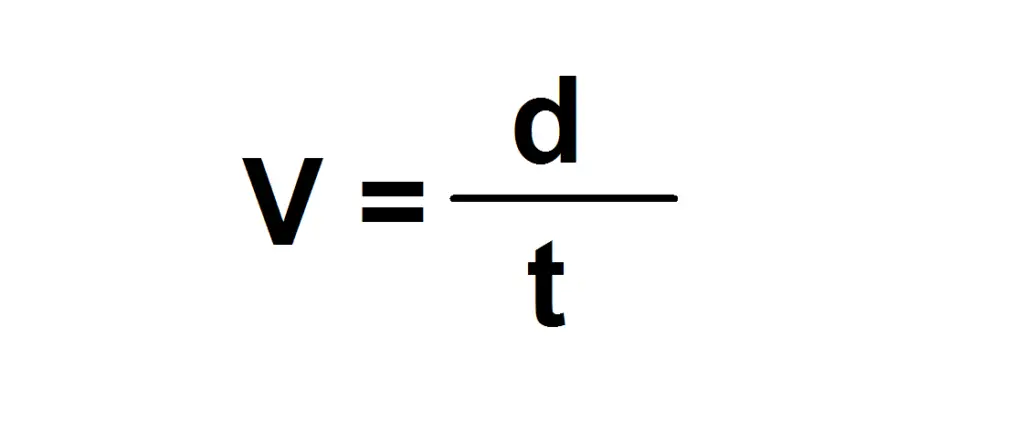
Where V represents speed, d is distance and t is time.
Rearranging this equation to calculate distance we get;

We know that sound travels around 343 metres/second, so the next thing we need to calculate the distance of an object is time (which is obtained from the ultrasonic sensor).
Note, the time value needs to be halved to calculate the distance of the object. This is because the time value the ultrasonic value will present to us, is the time it takes the sound wave to leave the transmitter, hit the object and return back to the transmitter.
We just need the time for the first part (which is the sound wave hitting the object) to calculate the distance of the object.
To do this, we can either halve the time value when calculating the distance, or halve the total distance value at the end.
Let’s look at an example to clear things up.
Say there is a wall about which you are trying to calculate how far away it is. The ultrasonic sensor gives you a time value of 0.005 seconds.
Option 1
Take this time value and divide it by 2. This now gives us a time value of 0.025 seconds.
Now, use this value and the speed of sound (343m/s), to calculate the distance. This gives us; Distance = 0.025 x 343 = 0.8575 meters.
Option 2
Use the initial value the ultrasonic proximity sensor gives us, calculate the distance and then divide it by 2.
So, first calculate the distance; d = 0.005 x 343 = 1.715 meters. Now, take this value and halve it; 1.715 / 2 = 0.8575 meters.
So, using either option will yield the same result.
Another important note is to make sure you are using the same units in your calculations. If you are calculating for meters per second, ensure your time values are in seconds and not milliseconds.
What do I mean by this?
Well, that time value we obtained from the ultrasonic sensor, can be either 0.005 seconds or 5 milliseconds.
However, since the speed of sound is metres per second (m/s) and not meters per millisecond (m/ms), you will need to use time in the form of seconds which is 0.005.
Can an ultrasonic sensor be used on its own?
No, unfortunately it cannot be used on its own.
The ultrasonic sensor needs a microcontroller or microprocessor to unleash its full potential.
A microcontroller has two main functions when used with the senor;
- Trigger the sensor to transmit a wave
- Obtain the time of the reflected wave and calculate distance
Trigger the ultrasonic sensor to transmit a wave
The first function the microcontroller has is to trigger the ultrasonic sensor to transmit a sound wave.
To do this, the TRIG pin on the sensor needs to be high (+5V) for a duration of around 10 microseconds (the ultrasonic sensor’s datasheet will also have the exact value it needs to be high for).
A microcontroller has many capabilities from analog to digital conversion, timing, serial communication, digital to analog conversion, and much more.
It also has a set of Digital Input and Output pins with each pin being bi-directional (this means you can assign a specific pin to be either an input or an output when programming the microcontroller).
These digital pins allow you to control a wide variety of outputs (motors, LED’s, fans, etc), and gather information from many different types of inputs (buttons, switches, sensors, etc).
When set as an Output, the pin can be set to be either a Logic High (+5V), or a Logic Low (0V).
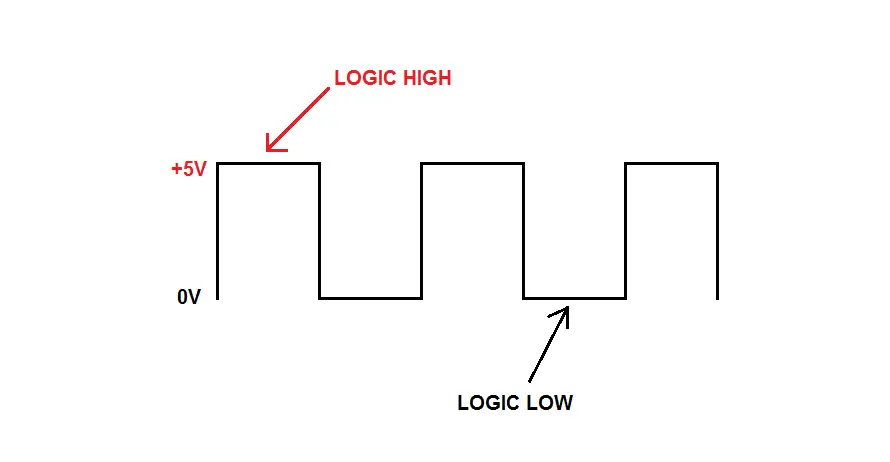
This is perfect for an ultrasonic sensor! You can connect the TRIG pin to one of the Digital I/O pins which has been set to an output.
You then just have to program the microcontroller to make the TRIG pin a logic high, set a delay for 10 microseconds and then make the pin a logic low.
The ultrasonic sensor will then transmit a sound wave.
Calculate the time of the reflected wave
Earlier in the working principle section, I mentioned that the timestamp is calculated with the help of a microcontroller. This is because the ultrasonic sensor does not have the ability to calculate time on its own.
Lucky for us, the microcontroller also has the capability of timing using a set of Timers.
Timers have many applications with the two main ones being; generating time delays, and measuring the time between two events.
‘Measuring the time between two events’ is perfect for use with the ultrasonic sensors. This means that we can measure the time between the Sound wave transmitted, and the Receiver receiving the reflected wave.
Another key pin of the sensor is the ECHO pin which gets connected to a digital pin of the microcontroller that is set as an input.
When the receiver of the sensor detects the return of the reflected wave, the ECHO pin is set to a ‘logic low’ which is then read by the microcontroller. This helps us know when to stop the timer.
Below are the sequence of steps of what happens inside a microcontroller’s code from triggering the ultrasonic sensor to calculating the time.
- Trigger ultrasonic sensor to transmit a sound wave via TRIG pin
- Start the timer
- Reflected wave returns, and is detected by sensor’s receiver
- ECHO pin goes low
- Stop the timer
- Acquire time value
- Calculate distance
Ultrasonic sensor connection to a microcontroller
The connection of the ultrasonic sensor to a microcontroller is pretty basic as it only has four pins that need to be connected.
Another great thing is that the ultrasonic sensor and microcontroller both operate at the same voltage which is +5 volts.
Below is the connection of an ultrasonic sensor and a microcontroller.
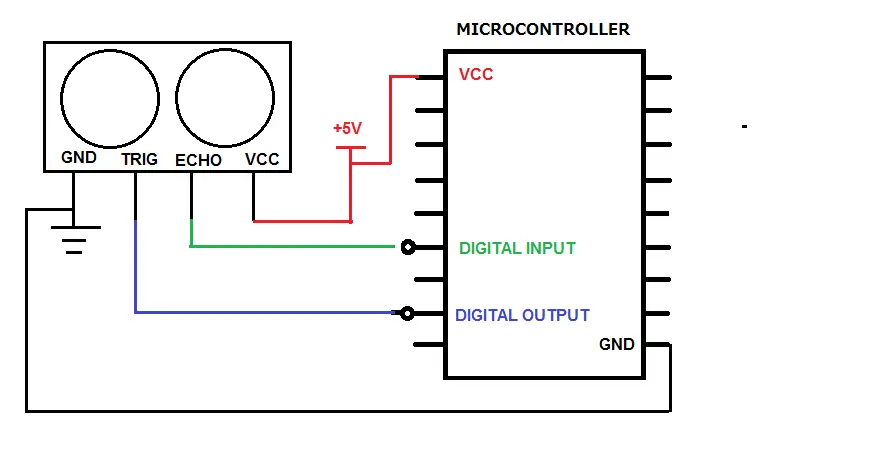
A note to make is tha thet ECHO and TRIG pins can be connected to any of the digital pins of the microcontroller.
However, since the digital pins can be either an input or output (depending on how you configure them when programming the microcontroller), you will have to make sure you configure the pins according to which of the ultrasonic sensor pins are connected to them (ECHO is an input and TRIG is an output).
Standard specifications of an ultrasonic sensor
Ultrasonic sensors have a certain set of specifications that help you choose the right one for the application.
While there are a wide variety of ultrasonic sensor brands available, they are not identical in their specifications.
However, below is a list of average values an ultrasonic sensor might typically have;
- Operating voltage: 3.3V – 5V
- Operating current: 8mA
- Nominal Frequency : 40kHz
- Coverage distance: 0.2m (0.65ft) – 6m (19.7ft)
- Resolution: ~1cm (0.4 inches)
- Sound pressure: 112dB (min)
- Measuring angle: 15 degrees
- Input pulse: 10 microseconds
What materials can an ultrasonic sensor detect?
I was recently using the ultrasonic sensor for a simple project which was to detect when someone entered the room.
Initially I had set up the sensor at a height that was aiming at the torso (mid-section) of a person. However, when it came to testing, the ultrasonic sensor hardly detected me when I entered its sensing area(or it was not effective 100% of the time, which isn’t ideal).
Then I just moved the sensor to floor level (now aimed at my legs), and I started getting better results.
What was the difference?
I was wearing shorts! I had no fabric material covering my legs, whereas my t-shirt was absorbing the sound waves rather than reflecting them.
After doing some research, I confirmed my conclusions were right. Ultrasonic sensors are not good with soft or irregular objects, as they might either absorb the wave or redirect them elsewhere.
I know, my project isn’t full proof due to the fact that someone might be wearing pants which will cause the same issues as before.
The ideal objects for detection using an ultrasonic sensor are large, flat surfaces. Objects such as;
- Metals
- Ceramics
- Glass
- Wood
Common applications of ultrasonic sensors
The ultrasonic sensor has many different applications where it makes use of its unique capabilities for sensing without the need for physical contact.
As you can imagine, there are a multitude of industries that could make use of this sensor. But, rather than naming all of them, I will list some of the more common applications where you might find an ultrasonic sensor.
- Car parking sensors– lets you know if you are getting too close to a wall, another car, or any object (can be located in the front of the back of the car)
- Level control – detect, monitor and regulate levels of liquids within a closed container
- Anemometers – measuring wind speed and direction
- Robotics – help robots navigate their surroundings by detecting objects
- Counting – used in manufacturing factories to count goods on conveyor belts
- Medical – Produce images of internal organs, identify tumors and monitor health of babies inside the womb
Again, this isn’t an exhaustive list by any means. There are many more applications with similarities to those mentioned above, so rather than naming them all of them I will save you the time by not repeating myself.
Can you use an ultrasonic sensor with an Arduino or Raspberry pi?
Yes, you can use an ultrasonic sensor with an Arduino or a Raspberry Pi.
As we saw earlier, the sensor requires a brain (either a microcontroller or microprocessor) to process the information it sends them.
Both the Arduino and Raspberry pi come as development boards that have a microcontroller or microprocessor which are capable of the functions required to operate the ultrasonic sensor.
These boards also have convenient pin slots for inputs, outputs, VCC and GND that you can connect the sensor’s pins to.
Why do we need ultrasonic sensors
But, why use ultrasonic sensors at all?
While you could survive without having to rely on ultrasonic sensors, utilising their abilities far outweigh not using them.
The most obvious reason we need this type of sensor is to detect objects without the need of physical touch. Also, if you need to acquire the distance of the object (to within a 1cm) this sensor will be beneficial.
Below are some other examples of why you might need ultrasonic sensors.
In the simple case of parking a car, you might be the best parallel parker in the world, but sooner or later your senses are going to fail you, and mistakes will happen (in the form of bumping the car in front or behind).
However, if you enlist the abilities of an ultrasonic sensor, you now have an ‘extra pair of eyes’. While you still have to park the car, you can be assured that the sensor will be a more efficient guide.
Another example is counting products on a conveyor belt. Sure, you could hire a human to do it. But, us humans have our limits of efficiency and effectiveness. Sooner or later, fatigue is going to set in and errors will be made.
An ultrasonic sensor does not get tired, therefore you have higher efficiency.
So, we need ultrasonic sensors as they make systems more efficient, effective, and accurate.
Advantages and disadvantages of ultrasonic sensors
Everything in life comes with its good side as well as bad.
The same is true for ultrasonic sensors too. Below is a list of the advantages and disadvantages of the sensor.
Advantages of ultrasonic sensors
- Detection without the need of physical contact
- Color and transparency of an object does not affect detecting abilities
- Low current consumption
- Can give accurate distance of object (near to 1cm / 0.4in)
- Effective during the day as well night
- Can operate in ‘high-glare’ environments
Disadvantages of ultrasonic sensors
- Acoustic noises near the operating frequency of sensor can cause interference in readings
- Cannot work in a vacuum
- Unable to detect soft or irregular shaped objects well
- Temperature fluctuations can affect the speed of the sensor’s ultrasonic sound waves
Other alternatives to ultrasonic sensors
As you now know, the ultrasonic sensor is a type of proximity sensor which utilises sound to detect objects.
But, you are not limited to just using ultrasonic sensors for detection. There are many other types of proximity sensor available each using different methods and technologies to achieve detection on an object without the need of physical touch.
Each will have its own set of unique characteristics as well as advantages which will make them suitable for particular applications.
Let’s take a quick look at each type of proximity sensor.
Inductive proximity sensor – Uses the law of induction to detect metal based objects. This means other non-metal based objects cannot be detected using this type of sensor.
Capacitive proximity sensor – This type of proximity sensor is able to detect both metal and non-metal based objects. It does so by detecting the change in capacitance within the sensor when objects enter its sensing field.
Infrared (IR) proximity sensor – Has a very similar working principle to the ultrasonic sensor. But, rather than emitting a sound wave, this sensor emits a beam of infrared light. Also, just like sound waves emitted by the ultrasonic sensor cannot be heard, the light emitted by the IR sensor is invisible to the naked eye.
Photoelectric proximity sensor – also emits a beam of light like the IR sensor, but is not limited to just infrared light.
Magnetic proximity sensor – This type of sensor employs technology which is capable of sensing magnetic based objects.
If you want a more in-depth guide about these types of proximity sensor, check this article.


